中文 (中国)
 Tiếng Việt
 한국어
한국어
1. What is a uv meter and which parameters does it actually measure?
Ultraviolet radiometers are highly specialized spectrophotometric instruments specifically designed to quantify ultraviolet radiation within harsh industrial environments. According to technical definitions from the Optical Society of America (OSA), ultraviolet radiation is divided into common industrial wavebands such as UVA (315-400 nm), UVB (280-315 nm), and UVC (100-280 nm). When consulting any professional UV meter guide, operators must first clearly understand the three core physical parameters these advanced devices record.
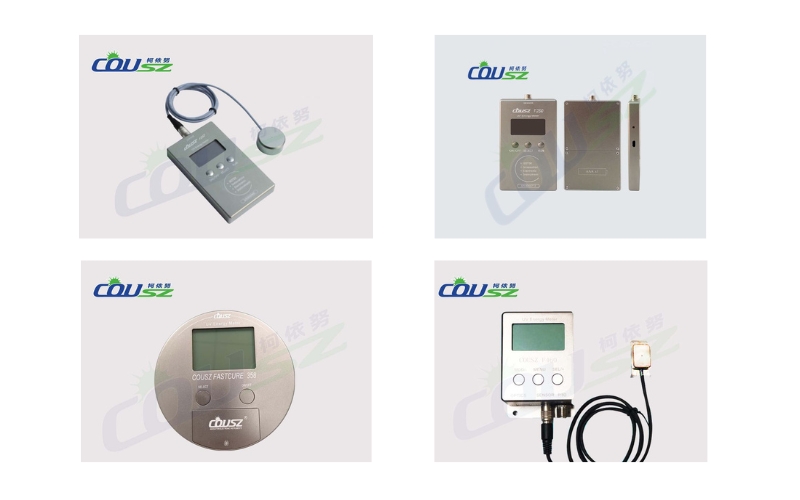
F150 UV Radiometer User Guide
Core parameters: irradiance, dose, and temperature
- Irradiance (Peak Power): Calculated in mW/cm². This represents the instantaneous, raw power of the light source at a specific moment in time as it strikes the surface. It dictates the radiation’s ability to penetrate deeply into thick layers of material.
- Energy Density (Dose): Calculated in mJ/cm² or J/cm². This is the total accumulated UV energy density that the material surface receives during its entire exposure period. This parameter is universally considered the most critical because it dictates the complete chemical cross-linking and absolute solidification of the photoinitiators.
- Temperature: Calculated in degrees Celsius (°C). Modern high-end models, such as the COUSZ F358, integrate sensitive thermal sensors to monitor the ambient heat of the curing oven, preventing the warping or deformation of heat-sensitive plastic films.
Grasping these concepts helps technicians differentiate between a high-intensity lamp with a very short exposure time versus a low-intensity lamp with a prolonged exposure time, allowing them to adjust conveyor speeds and lamp heights accordingly.
F250 UV Tester Operation Guide
2. How to prepare your equipment properly before taking measurements?
Discrepancies in measurement results rarely stem from the hardware itself failing; they usually originate from flawed, inconsistent preparation routines. To apply this UV meter guide effectively and guarantee data reliability, you must perform several strict pre-checks before placing the delicate instrument under intense radiation.
2.1. Inspecting the sensor window and battery levels
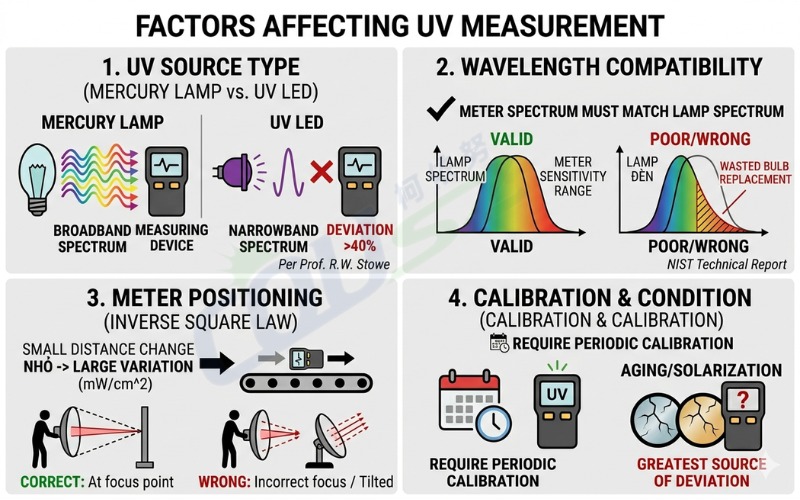
Ensure the quartz glass filter of the probe is completely free from microscopic dust, human fingerprints, or accidental adhesive residue. According to extensive optical research by Professor R.W. Stowe, an esteemed expert in optical metrology, even a seemingly invisible layer of dust on the sensor can scatter light and cause an alarming error margin of up to 15% in your final readings.
Simultaneously, check the battery capacity. A weak power supply can severely distort the microprocessor’s sampling rate, causing it to miss the absolute peak irradiance. For models utilizing standard AAA batteries, replace them immediately if the LCD screen appears even slightly dim or flickers.
How to Use F358 UV Light Meter Effectively
2.2. Verifying spectral compatibility and cleaning the belt
Identify the compatible waveband for your specific production line. You cannot use a UVA-focused radiometer to evaluate a 395nm LED system if the instrument is not properly calibrated with narrow-band filters for that exact spectrum. Thoroughly reading the manufacturer’s official UV meter guide will help you select the exact device model required to match your light source’s emission profile.
Finally, clean the conveyor belt. Ensure the path the device will travel is completely free from mechanical obstacles, debris, or excessive vibrations that could compromise the optical sensor’s physical stability as it passes beneath the reflector housing.
3. Step-by-step uv meter guide for precise and repeatable operation
Below is the standard operating procedure designed to help you master the equipment professionally. Adhering to these steps ensures that every single data point you collect is highly repeatable and scientifically valid.
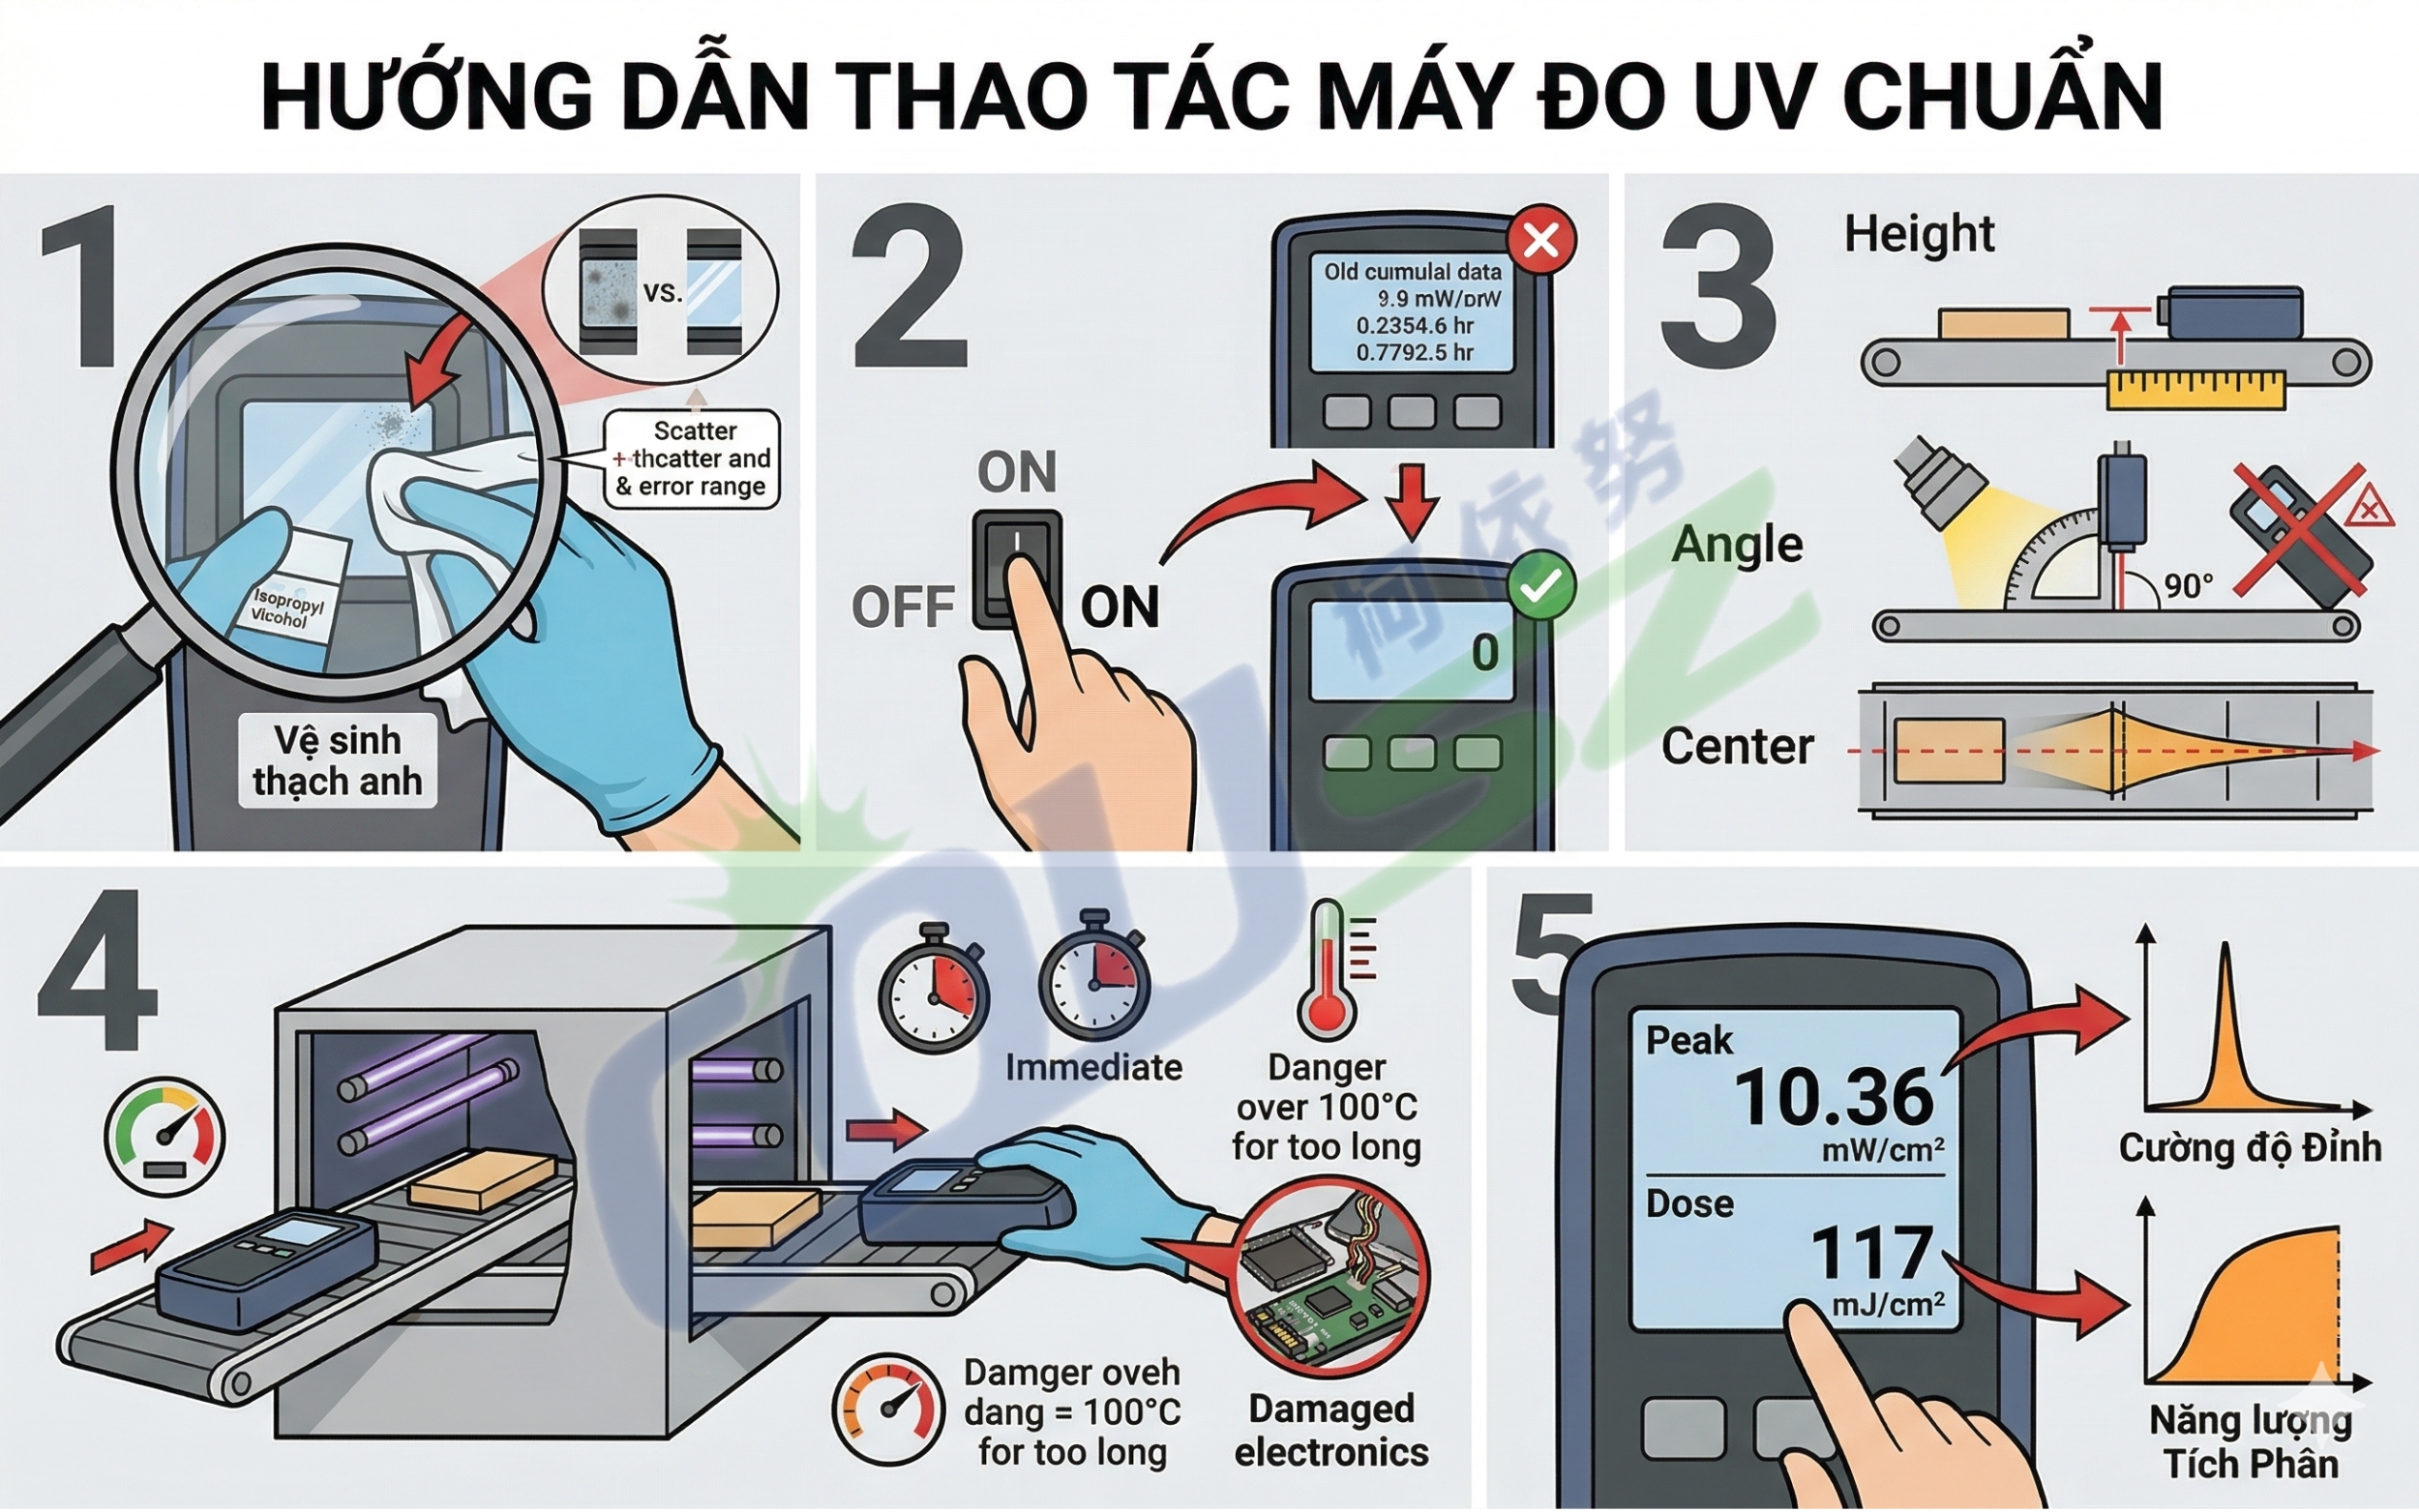
3.1. Positioning the device correctly
The exact spatial placement of the radiometer dictates the authenticity of the gathered data. If you position it too far from the light source or at a skewed, uneven angle, the received intensity will plummet according to the inverse square law of optical physics.
- Height alignment: The instrument must be placed at the exact height of the actual product surface. If your substrate sits 5cm above the conveyor belt, you must elevate the radiometer to exactly 5cm using a heat-resistant block.
- Probe orientation: The signal-receiving window must face the bulb directly at a perfect 90-degree angle. Every professional UV meter guide strongly advises against tilting the device, as this will introduce a significant “cosine error,” causing you to measure UV intensity inaccurately.
- Focal point centering: Place the device in the exact center of the conveyor belt where the lamp’s focal intensity is strongest to capture the true, uncompromised Peak value.
F460 UV Light Tester User Guide
3.2. Executing the measurement run
Once the geometric position is rigorously verified, you can initiate the active measurement process:
- Turn on the machine by holding the main power button (usually requiring a firm press for 2-3 seconds).
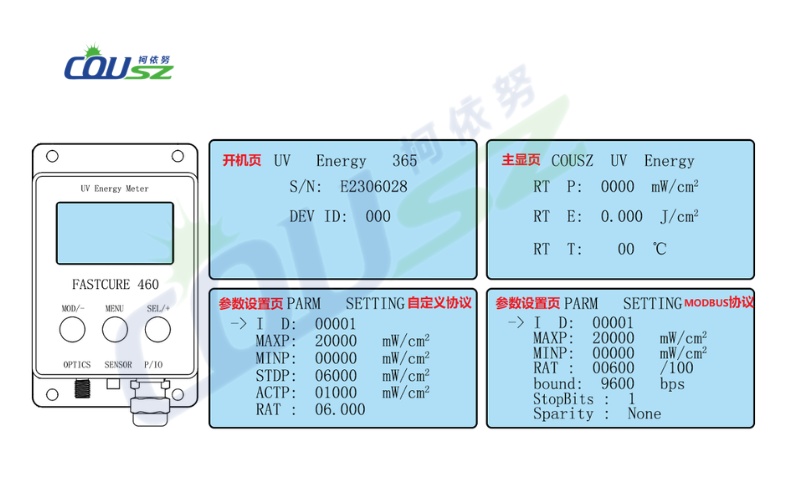
- Perform a System Reset: Ensure all parameters on the digital screen read zero before the device enters the curing oven. This is a mandatory step in any industrial data logging procedure to clear the memory buffer.
- Send the device through the heat chamber at the exact conveyor speed used for actual commercial production.
- Once the device exits the chamber, retrieve it immediately using heat-resistant gloves to prevent accumulated ambient heat from destroying the internal electronic circuit boards.
📌 Learn how to configure and analyze UV measurement results with the COUSZ F580 UV Energy Meter
F580 UV Energy Meter Guide
3.3. Reading and analyzing the final results
After the run is completed, the next critical step is data analysis. Understanding how to interpret the digital display is vital to following this UV meter guide correctly.
The Peak Value (mW/cm²) tells you the absolute highest intensity the lamp achieved. If this value falls below your baseline standard, the bulb may have reached the end of its photon lifespan, or the aluminum reflector is severely clouded by outgassing. The Total Energy (mJ/cm²) is the mathematical integral of intensity over time. If your target UV energy density is achieved but the peak power is too low, you might need to physically lower the lamp housing closer to the belt. Conversely, if the peak is perfectly fine but the total energy is insufficient, you simply need to slow down the conveyor belt speed.
4. What are the common mistakes during the measurement process?
Even if you have memorized every single rule in the UV meter guide, frequent human errors still occur on the bustling factory floor. Recognizing these pitfalls early helps optimize your workflow and drastically extends the lifespan of your expensive metrology tools.
Typical operational errors to avoid
| Common Operational Error | Physical Consequence | Corrective Action |
|---|---|---|
| Forgetting to reset old data | Causes the newly accumulated UV energy density to add directly onto the previous run’s data, resulting in a massively inflated, false reading. | Always press the “Reset” or “Zero” button before placing the device on the moving conveyor. |
| Setting the wrong spectral band | Using a traditional mercury lamp radiometer for a modern LED system means the sensors cannot “see” the narrow light, yielding near-zero results. | Verify the lamp’s emission spectrum (e.g., 395nm) matches the device’s optical filter. |
| Ignoring temperature limits | When the internal temperature exceeds 125°C, optical components suffer from severe zero-drift, rendering attempts to measure UV intensity totally meaningless. | Use thermal shields and never leave the device stagnant under an active, high-power lamp. |
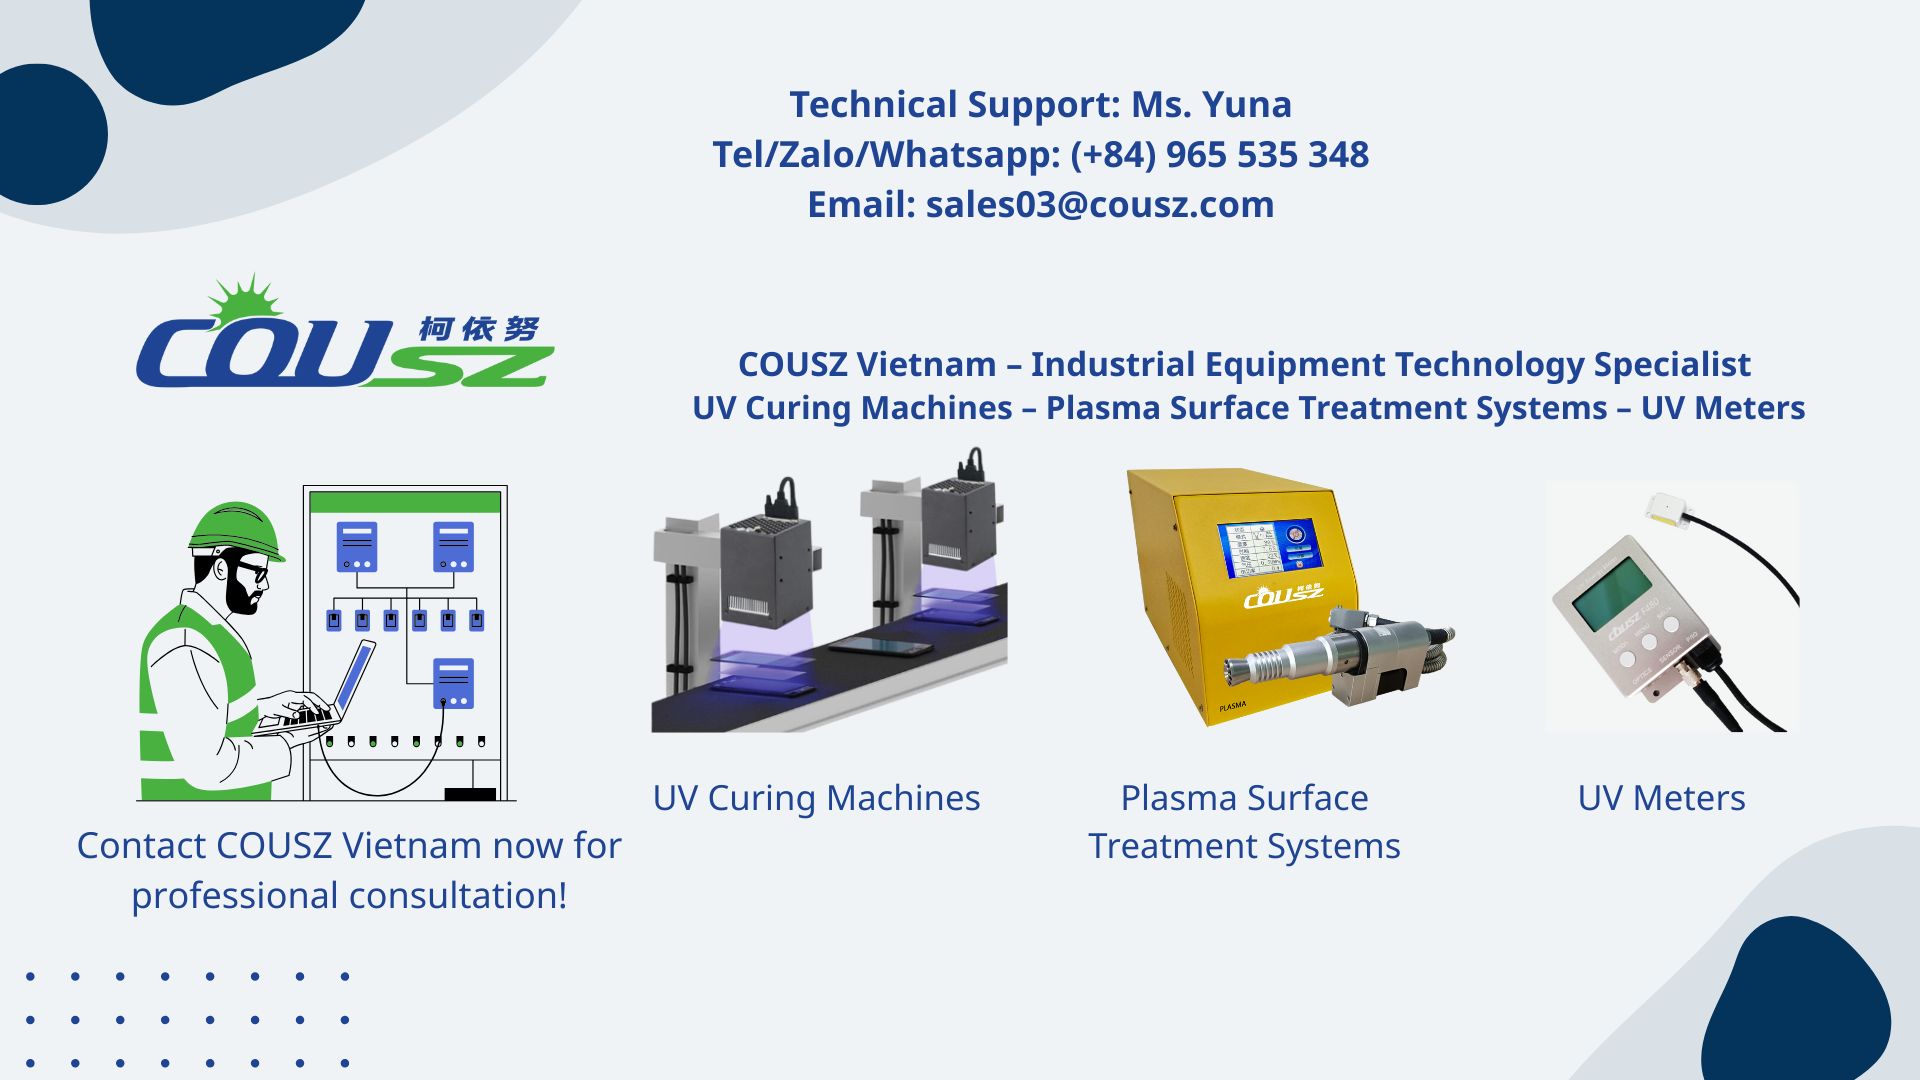
5. How to contact cousz for technical consultation?
To receive an official, comprehensive UV meter guide tailored specifically to your facility’s architecture and expert advice on the most suitable radiometers for your enterprise, contact us immediately. For further insight on hardware care and recognizing degradation, please read our detailed article: How to operate a UV meter correctly and identify component replacement signs.
👤 Ms. Yuna
✨ Technical Specialist – COUSZ Vietnam
📞 Tel/Whatsapp/Wechat/Zalo: (84) 965 535 348
📧 Email: sales03@cousz.com
🌐 Website: www.cousz-vn.com
6. Faqs – frequently asked questions about uv measurement
6.1. What are the most important parameters to monitor?
When applying this UV meter guide, you must pay special attention to Peak Power (mW/cm²) to assess the overall health of the lamp, Total Accumulated energy (mJ/cm²) to guarantee the photoinitiators in the adhesive are fully cross-linked, and Peak Temperature to protect the substrate material from warping. Additionally, always double-check the wavelength band (UVA/UVB/UVC/UVV) to ensure you are capturing the correct spectrum of light.
6.2. Why do different devices give different results under the same lamp?
This discrepancy typically stems from distinct differences in optical filter designs, cosine responses, and calibration standards between different global manufacturers. Unifying how you measure UV intensity by strictly standardizing a single radiometer model across your entire factory will result in highly consistent, repeatable, and trustworthy data.
6.3. How does conveyor speed affect the readings?
Conveyor speed directly and proportionally impacts the total energy (mJ/cm²) but has absolutely zero physical effect on the peak power (mW/cm²). This is foundational knowledge for any UV curing process. If you slow down the belt, the energy dose increases simply because the material’s exposure time under the light is prolonged.
6.4. How often should we calibrate the radiometer?
Based on stringent recommendations from global metrology experts and ISO 9001 standards, you should formally recalibrate the instrument every 12 months. Following a proper UV meter guide requires annual calibration because continuous use in harsh industrial environments ages the optical sensor, making professional recalibration the only proven method to maintain long-term accuracy.