中文 (中国)
 Tiếng Việt
 한국어
한국어
In modern automated production lines, UV energy control is no longer limited to periodic manual inspections. The F460 UV light tester guide introduces a top-tier solution for real-time monitoring. Integrating this device into PLC systems or central computers requires a detailed roadmap to ensure a smooth quality control workflow and process optimization.
1. Why is F460 the top choice for online UV monitoring?
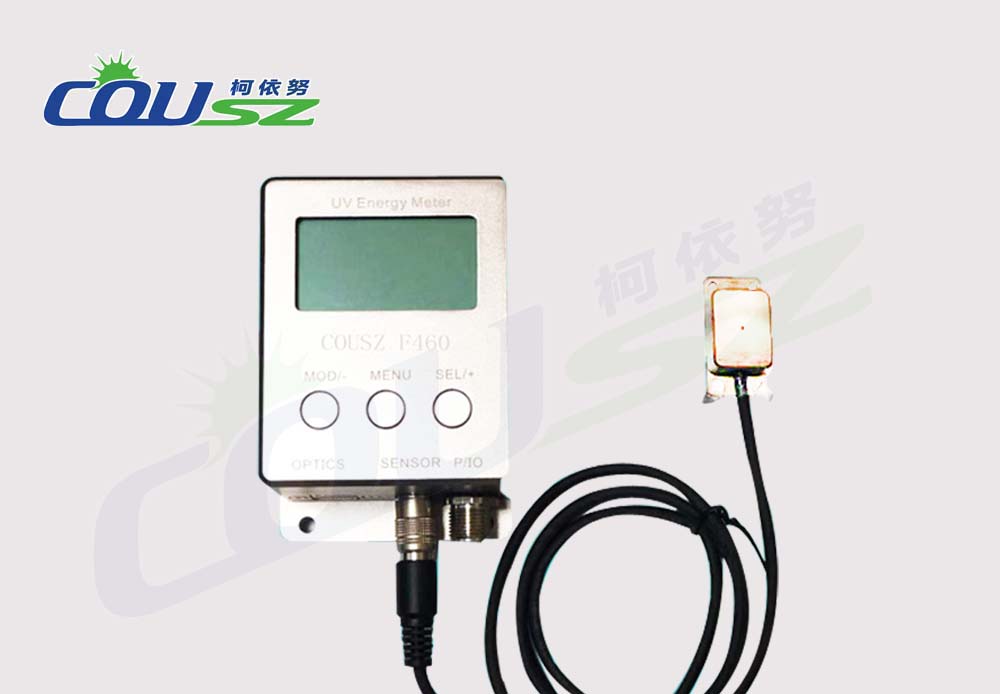
The F460 is not just a simple meter; it is a highly flexible real-time monitoring system. It allows users to track three critical parameters simultaneously: optical power (mW/cm²), accumulated energy (J/cm²), and probe temperature (T).
Advanced integration capabilities
The most valuable aspect of an online UV monitoring system is its serial communication capability via RS485 or RS232 ports. This allows the device to “talk” directly to supervisory control systems, instantly issuing alarm signals if UV lamp intensity drops or if the curing oven overheats. This proactive approach prevents mass production defects before they occur.
Recent studies by international industrial engineering journals emphasize that real-time data acquisition reduces waste by up to 15% in high-speed printing and coating lines. The F460 aligns perfectly with these Industry 4.0 standards.
2. Detailed technical specifications of the F460 device
Before diving into operational steps, the F460 UV light tester guide requires users to master the physical and technical limits of the machine to prevent damage and ensure longevity.
Technical parameters breakdown
| Parameter | Detailed Value |
|---|---|
| Spectral Range | Single band (Options: 365nm, 385nm, 395nm, 405nm) |
| Power Range | 0 – 20,000 mW/cm² |
| Energy Range | 0 – 10 J/cm² |
| Accuracy | Error less than ± 10% |
| Temperature Range | -55°C — 125°C |
| Sampling Frequency | 10Hz |
| Power Supply | DC 12-24V |
| Communication Port | RS485 or RS232 (Optional upon purchase) |
Note: The probe and the main body are permanently linked. You should not attempt to swap probes between machines with different peak wavelengths (e.g., installing a 365nm probe on a 395nm machine), as this will result in severe measurement discrepancies. This is a primary caution in any real-time UV measurement setup.
3. Understanding the interface and LCD display structure
When following the F460 UV light tester guide, you will interact with two main types of LCD screens designed for clarity in high-pressure environments.
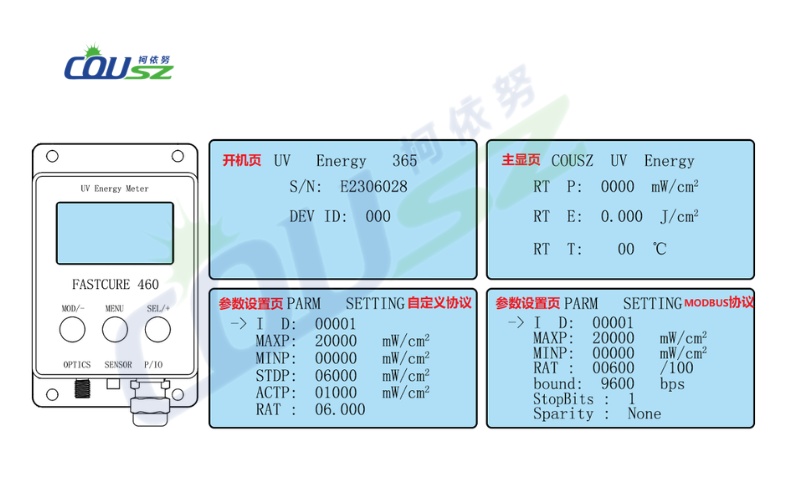
Boot and main measurement screens
- Boot Screen: Displays the measured wavelength (e.g., 365nm), the Serial Number (S/N) for equipment management, and the Station ID (ID) for communication.
- Main Screen (Measurement Status):
- Line 2: Real-time optical power (P).
- Line 3: Current accumulated energy (E).
- Line 4: Probe temperature (T).
Monitoring these screens allows technicians to quickly identify light source health without needing to access computer software immediately.
4. Setting parameters in the F460 UV light tester guide
To make the device work as intended, you need to know how to customize parameters in the settings page. Depending on the protocol (MODBUS or custom), the menu items will vary slightly.
4.1. Setting ID and Alarm thresholds (MAXP/MINP)
MAXP/MINP: These are the upper and lower alarm thresholds for optical power. If the UV lamp operates too weakly (below MINP) or too strongly, potentially causing excess heat (above MAXP), the device will output voltage at the alarm signal wire (Alarm 12V) to trigger a buzzer or signal light.
4.2. Calibration and ratio adjustments (STDP/ACTP)
Calibration (STDP/ACTP): You can adjust the ratio (RAT) by entering the reference display value (STDP) and the actual measured value (ACTP). However, this operation should only be performed by professionals to ensure the machine does not deviate from its factory standard. For more general information on calibration, refer to the Full UV Meter Usage Guide: Precise Measurement Made Simple.
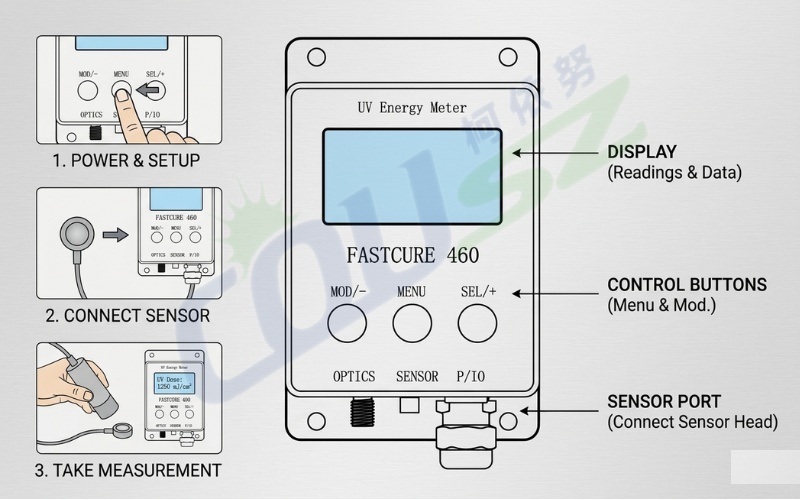
5. Functionality of the navigation keys
To master the F460 UV light tester guide, you must memorize the functions of the three primary physical buttons:
5.1. Key mapping and shortcuts
- MENU Key: Used to switch between display pages, move the cursor during numeric entry, and exit settings.
- MOD/- Key: Used to move the cursor downward or decrease numeric values.
- SEL/+ Key: Used to enter detailed setting items or increase numeric values.
Pro Tip: When on the main screen, if you want to return to settings, simply press MENU to initiate the adjustment cycle.
6. Industrial-standard wiring diagram
A non-negotiable step in the F460 UV light tester guide is the proper connection of power and signals. The F460 uses a multi-core cable with strictly defined wire colors.
6.1. Wiring color code table
| Order | Color | Definition | Detailed Function |
|---|---|---|---|
| 1 | Brown | Power/DC12-24V+ | Positive power terminal (Max 1A) |
| 2 | Blue | Power/DC- | Negative power terminal |
| 3 | Green | 485 A+ / 232 RXD | Data reception signal |
| 4 | Grey | 485 A- / 232 TXD | Data transmission signal |
| 5 | Red | Alarm 12V+ | Alarm output positive terminal |
| 6 | Black | Alarm 12V- | Alarm output negative terminal |
Warning: Ensure the input power stays within the 12-24V range. Providing power exceeding this level will burn the central control circuit of the F460 unit.
7. Communication protocol and computer connectivity
For programming experts, the F460 UV light tester guide focuses heavily on the MODBUS RTU protocol or the manufacturer’s custom protocol.
7.1. MODBUS RTU UV meter configuration
- Default Params: Baudrate 9600bps, 8 data bits, 1 stop bit, no parity.
- MODBUS RTU: Supports reading/writing register data. You can use read commands to retrieve power, energy, and temperature values from the device ID (default is 1).
- Custom Protocol: Data frame structure starts with code 7E and ends with 0D 0A.
Note: Data communication can only occur when the device is on the Main Screen. If it is on the settings page, the serial port will be temporarily disconnected to prioritize local configuration.
8. Practical operation example: Changing MAXP alarm threshold
To help you visualize the process, this F460 UV light tester guide provides a simulation of changing the upper alarm threshold:
8.1. Step-by-step threshold adjustment
- At the main screen, press MENU to enter settings.
- Use the MOD/- button to move the cursor to the MAXP item.
- Press SEL/+ to start editing.
- Press MENU to move between units, tens, and hundreds.
- Use the +/- buttons to change to the desired value.
- Press MENU repeatedly until returning to the main screen to save settings.
This simple operation is highly effective in protecting the production line from overheating incidents.
9. Essential tips to extend device lifespan
Any professional guide will emphasize probe preservation to ensure long-term stability in your curing system.
9.1. Maintenance best practices
- Incident Angle: The probe’s signal reception window must always be oriented at a 90-degree angle to the UV source for the most accurate results.
- Heat Protection: Although the probe can measure up to 125°C, leaving the probe and cable under high-intensity UV light for too long will age the plastic casing and sensor. Consider installing an air-cooling system if the oven temperature is excessive.
- Cleanliness: Keep the probe’s quartz window clean. Dust buildup will attenuate light intensity, causing the machine to display lower results than actual reality.
- Calibration: You should have the device calibrated annually to maintain its factory accuracy.
10. Contact for professional UV Light Tester consultation
If you are encountering difficulties in setting up the MODBUS protocol or need assistance with signal wiring, do not hesitate to contact COUSZ experts. We provide comprehensive solutions for industrial UV measurement across Vietnam.
Reach out to our technical team for UV Light Tester
👤 Ms. Yuna
✨ Technical Solution Specialist – COUSZ Vietnam
📞 Tel/Whatsapp/Wechat/Zalo: (84) 965 535 348
📧 Email: sales03@cousz.com
🌐 Website: www.cousz-vn.com
11. FAQs – Frequently asked questions about F460
11.1. Why is the energy value on F460 not increasing?
Check if the current light intensity exceeds the minimum threshold of the machine. If the power is too low, the machine will not accumulate energy. Also, check probe connections as per the F460 UV light tester guide.
11.2. Can I extend the probe cable?
The probe cable is calibrated with the device. Self-cutting or extending the cable can change resistance and cause inaccurate results. If a longer cable is needed, request a factory configuration upon purchase.
11.3. Can F460 measure both Mercury and LED lamps?
Yes, depending on the model chosen (365nm for Mercury or 385/395/405nm for LED). However, each device is optimized for its fixed wavelength range.
11.4. How do I reset the accumulated energy?
Energy values typically reset when restarting the device or via a clear command in the communication protocol. Refer to the protocol section for the specific clear command code.
11.5. Is the F460 waterproof?
No. F460 is a precision electronic device. Keep it away from high humidity or corrosive chemicals to protect the internal circuitry.