中文 (中国)
 Tiếng Việt
This comprehensive manual is compiled to guide operators on how to use spot UV curing systems accurately and highly efficiently. By mastering your new spot UV curing equipment, you can ensure flawless product assembly and maximize machine lifespan. Please read this entire document carefully before operating the device.
Important Note: This guide is an integral part of your machine. Keep it accessible for quick reference. Do not disassemble the controller or LED head casing independently, as this voids the warranty.
1. Basic safety rules on how to use spot UV curing systems
To ensure stable operation and prolonged equipment life, users must strictly adhere to the following industrial UV curing safety guidelines. Knowing exactly how to use spot UV curing systems starts with protecting both the operator and the hardware.
1.1. Power supply and grounding
Always verify that the power plug maintains excellent contact. The voltage and frequency must perfectly match the spot UV curing equipment specifications (Standard: 100-240VAC, 50-60Hz).
Furthermore, the controller and LED lamp head must be effectively grounded. Proper grounding eliminates static electricity, protecting delicate internal electronic components and ensuring operator safety.
1.2. Temperature control and condensation
Excessive heat creates severe operational hazards. Ensure all components are cooled correctly:
- Air-cooled systems: Keep the air intake and exhaust vents completely unobstructed at all times.
- Water-cooled systems: Guarantee that the circulating water pipes are never blocked or kinked.
If the cooling water temperature is lower than the ambient room temperature in high humidity, condensation will form on the pipes and LED head. To resolve this, adjust the water temperature or warm the environment to prevent catastrophic moisture damage.
1.3. Skin and eye protection
Ultraviolet radiation emitted from the LED head is harmful to human health. This is the absolute most critical rule of industrial UV curing safety: Operators must always wear specialized anti-UV safety goggles and protective clothing during the entire machine operation.
2. Understanding the UV LED controller interface
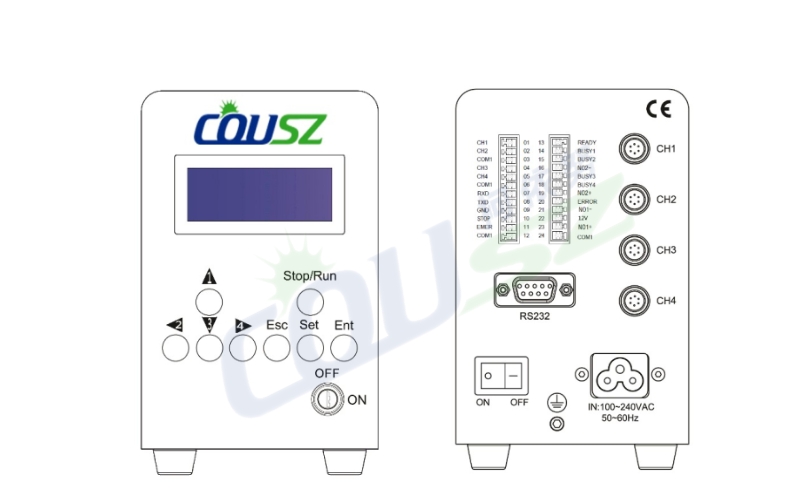
Mastering the UV LED controller interface is the key to accelerating your production line. Below is a detailed explanation of the front and rear panels.
2.1. Front panel navigation
The front UV LED controller interface features intuitive buttons for configuring your curing cycles:
| Key Name | Primary Function | Usage Notes |
|---|---|---|
| Arrows (1-4) | Navigate menus & select channels | Used to move the cursor when setting coordinates. |
| Stop/Run | Activate / Pause the system | Always check the substrate material before hitting Run. |
| Ent (Enter) | Save settings / Master ON/OFF | Hold to save configurations in the settings menu. |
| Esc | Exit menu without saving | Quickly return to the main dashboard. |
| Setting Key | Unlock parameter editing | Must be ON to edit. Turn OFF during standard operation to lock settings safely. |
2.2. Rear panel connections
Properly connecting the rear ports is mandatory for stable operation:
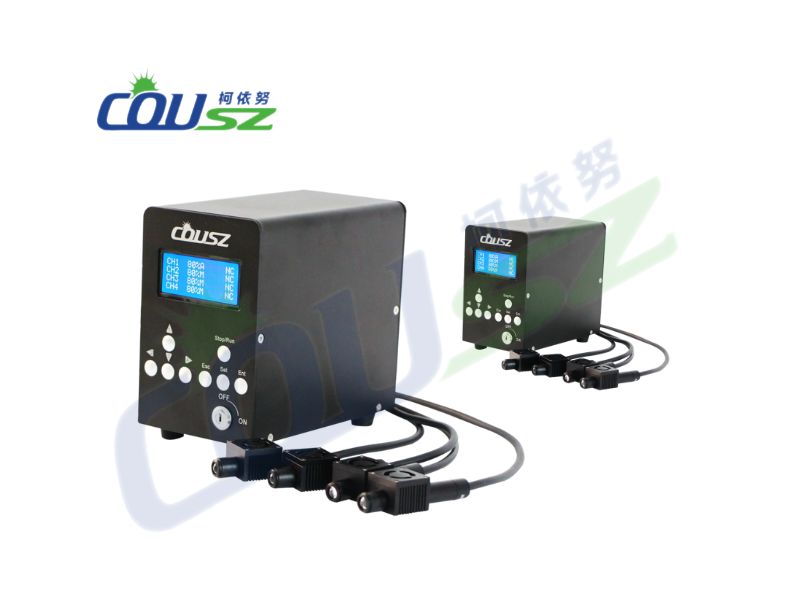
- Lamp Head Ports (CH1 – CH4): Connects the controller to the LED heads. Always tighten the plugs securely to prevent power loss during operation.
- 24P Terminal: Allows connection to PLCs or automated sensors. This is vital for robotic integration.
- RS232 Interface: Supports remote computer control and software updates.
👉 Learn how to elevate your manufacturing lines:
High-speed UV Curing Technology in industrial applications
3. Step-by-step guide on how to use spot UV curing systems
Operating the machine correctly guarantees high yield rates. Here is the operational workflow detailing how to use spot UV curing systems from COUSZ.
3.1. Controller operating modes
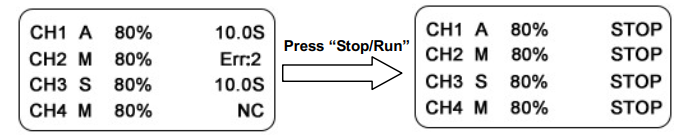
After powering on, the UV LED controller interface will display the main dashboard following a brief self-test. You can select between three primary modes:
- M (Manual mode): The operator manually turns the LED on and off. The timer counts up.
- A (Automatic mode): The operator triggers the start, and the system automatically shuts off when the pre-set time expires. The timer counts down.
- S (STEP mode): The system operates in a cyclical pattern containing up to 8 distinct steps, allowing varied intensities and durations per step.
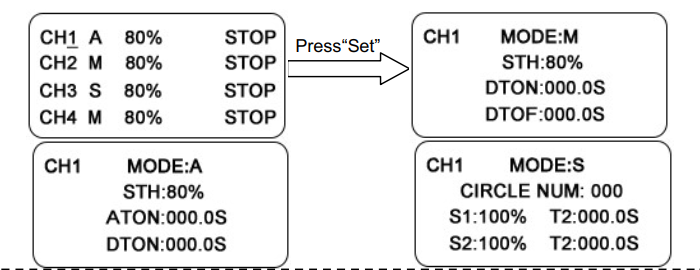
3.2. Setting parameters and error codes
Press SET to enter the channel configuration. Use the arrow keys to adjust the following critical parameters:
- STH: Irradiation intensity (Range: 0–99%).
- DTON / DTOF: Delay time for turning the lamp ON or OFF (Range: 0–999.9 seconds).
- ATON: Total illumination time in Auto mode.
- CIRCLE NUM: Number of loop cycles.
If an issue occurs, the screen will display an error code (Err). Understanding these is vital for industrial UV curing safety:
- Err1: LED chip malfunction.
- Err2: EMER (Emergency safety circuit) is disconnected.
- Err3: The LED head temperature has exceeded safe limits.
- Err5: The LED head cable is loose or completely disconnected.
4. Faqs on how to use spot UV curing systems
What should I do if the screen displays “Err3”?
Err3 indicates the LED head is overheating. Immediately stop production and check your cooling system. If it is air-cooled, clean the dust filters. If it is water-cooled, ensure the chiller is functioning and water is actively flowing.
Why is my machine not allowing me to change the curing time?
Check the “Setting Key” on the front panel. If this physical key is turned OFF, the system parameters are locked to prevent accidental changes by factory workers. Turn it ON to adjust your times and intensities.
Can I run different curing intensities on a single part?
Yes. By utilizing the “S (STEP)” mode, you can program the machine to execute up to 8 different sequential steps. For example, Step 1 can cure at 50% intensity for 2 seconds, and Step 2 can instantly switch to 99% intensity for 5 seconds.
5. Contact COUSZ for technical support
Mastering how to use spot UV curing systems ensures your assembly line runs at peak performance without costly interruptions. Investing in high-quality spot UV curing equipment from COUSZ guarantees durability and precision.
If you require advanced technical training, PLC integration support, or have any questions regarding your machine’s operation, contact our engineering experts today:
👩💼 Consultation Expert: Ms. Yuna
📞 Tel / WhatsApp / WeChat / Zalo: (84) 965 535 348
📧 Email: sales03@cousz.com
🌐 Website: cousz-vn.com
🏢 Address: Ngo Xa Village, Phat Tich Commune, Bac Ninh Province, Vietnam.